Showing posts with label Foundation. Show all posts

Thursday, January 12, 2012

REVIEW: Lancome Teint Idole Ultra Foundation


This foundation retails for a good $42.00.
This is a Matte finish, *full coverage* foundation that is recommended for all skin types.

My shade is Bisque 5


This is a very long lasting foundation. Lancome claims that it will last 14 hours, I can't really say that it does because I don't wear my makeup that long, but for the 8-10 hours I usually wear it, it does stay on.


*I wouldn't say it's "full" coverage, I would say it's more of a "heavy medium/buildable" coverage. It goes on really nice, you have to work on one area of the face at a time, rather than applying it all over the face and then blending. It dries quick, which brings me to my next point, it dries to a powder!


Application can be a little bit tricky, I think it takes a little bit to learn how to use it and make it look nice on you, but if you are willing to spend $42.00 on one product, I think you should be willing to take the time to work with it before deciding you don't like it.
When applying this product you MUST have a completely clean and smooth face. This is the kind of foundation that forces me to exoliate and moisturize daily. If you have any, and I mean ANY flakes, once the foundation dries you will be able to see them.


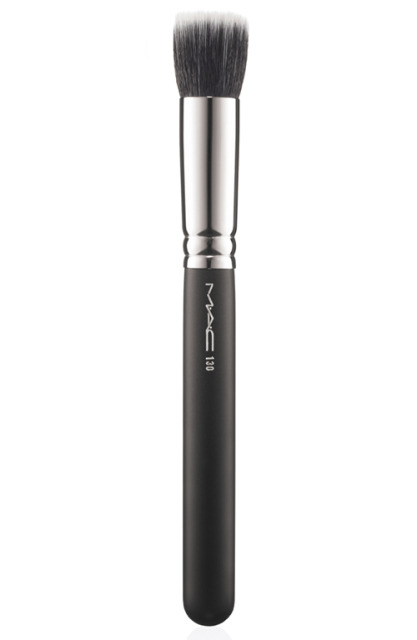
I have tried many different brushes but I have found that the MAC 130 is the best one for it. That is the amount I use for one third of my face. Which at the end of the day comes down to a pump and a half. Keep in mind thou, I like more coverage than your average Jane!
On the left photo I am wearing no makeup at all. Right photo, after having applied foundation. No concealer or anything else on. And this is what it looks like after doing all of my face.


Thursday, May 27, 2010

Review: Smashbox Camera Ready Full Coverage Foundation Spf 15

Price: $38.00
Where to buy: Smashbox counters, sephora.com, sephora stores, smashbox.com, etc.
Description: A lightweight yet buildable cream to powder full coverage foundation that’s good for your skin. This luxurious, creamy formula glides on effortlessly leaving a semi-matte finish without being cakey or heavy... this foundation leaves skin looking naturally flawless.
I am going to make this short and simple (yeah, right! this is probably going to turn out to be one of those never ending posts!):
Once again, in my search for the perfect foundation I gave this one a try.  Up until that point I hadn't tried any smashbox products (besides for my brow brush) and I really wanted to, I've heard so many good things about their primers so I thought their foundation had to be pretty good as well... anyway, so I ended up buying this one, what attracted me to it is the fact that is full coverage. 
Here are the facts:  This foundation is called "camera ready" for a reason... it makes you look awesome in pictures... and I will give it that, you will most definitely look good in photos... but what about in person??? That, my friends, is the question!
Let me start by saying this: Application absolutely SUCKS! Excuse the language, but that is trully how I feel. This is a cream to powder foundation, so I was a little out of my element when applying it at first, I am used to liquid.  The first time I tried it with the brush that it comes with, I applied concealer, primer and my clarins cream prior to it... it did NOT look good.  The second time I tried it with my mac 130 brush and applied the smashbox primer instead of my mac one... didn't make a difference.  Third time I didn't apply my concealer on first, hoping that it would look less cakey, nope... didn't work. And yesterday I gave it a try one last time, I wanted to take pictures to show you all what I mean when I say that "it didn't look good" and once again it did NOT look good.
The thing with this product is that it only looks bad when you see it up close.  If you are to look at yourself in a mirror from, let's say, 4 feet away you are going to love what you see! I don't know what it is with this foundation but from far away it makes your skin look even toned and like it really does provide full coverage.  When you see yourself up close is when you start having issues with it.  Just look at the pictures:
It settles into every little fine line or dryness you may have on your skin.  My Clarins cream did nothing under this foundation.  Notice my nose and pores on my cheek? My regular foundation does NOT make me look like this.
Look at all of that cakeyness on my forehead! And this is supposed to be a full coverage foundation... well, what do you think?! I can still see my acne scars under it!
And around my lip and my cheeks... more cakeyness... this foundation looks nothing but natural, at least not up close. 
Please note that I tried really hard to blend this foundation onto my face and these pictures were taken after me blending and blending it like a maniac.
Would I recommend it?  NO, NO, NO!  Unless you are a model and all you do is take pictures for a living or you won't have any close up human interaction, than this foundation is not for you.   It is impossible to apply it so that it looks natural, oh, I should point out that that the lady at the Smashbox counter told me to use their smashbox face and body brush with it to achieve the best results but I am not going to spend $52.00 on a brush just for that foundation! So maybe if you do apply it with this brush it would look better but I honestly don't think so.
I am wearing this foundation on this picture, see what I mean by looking good in pictures?  But who cares if you look good in pictures when in person your face looks cakey and you see the product settle in all your fine lines and dry spots on your skin!  I am sad to say that this baby is going back to the store.  I really wanted it to work, for once I found a foundation that matches my skintone perfectly... so I guess my search for the perfect foundation is still on. 
I rate this product a 1 out of 5

Friday, May 21, 2010

Review Time: Estee Lauder Double Wear Stay-in-Place Makeup with Spf 10.


I bought this foundation a while ago, I am always on the look for the “perfect” foundation (I haven’t found it yet, still looking). I was walking by the makeup counters at Nordstrom in Anchorage and for the first time decided to walk by the Estee Lauder counter. They were having a “gift with purchase” event and if I spent $39.50 in any products from this brand I would get a bunch of free stuff, so I gave it a go. I explained to this French lady that I wanted a Full Coverage Foundation, that I wanted it to last all day, not make me breakout, look natural on my skin and match my skin color perfectly, so, without even thinking about it she told me to buy this Double wear foundation, she swore by it and even dared to tell me that it was the best foundation from ALL of the brands that Nordstrom has, which is a HUGE statement, considering that you can find brands like Mac, Lancome, Chanel and others in there… so I fell for it.
Let me start by telling you this was NOT a cheap product to buy, it costs $33.50 and the bottle has 1.0 oz! The bottle does not come with a pump, so you have to get all messy when applying it, which is another turn off for me, but still, I thought to myself “if this is the perfect foundation, I am willing to pay for it and even get a little messy with it, who cares!”… So I took it home, along with all of my free stuff (haha!) and gave it a try that whole week.
Out of all of the requirements that I was expecting this foundation to do, only two of them were “ok”: Color match was a “ok”, better on my skin than some other foundations I’ve tried; and it’s long lasting ability was definitely there… believe me, once you put this thing on you, it won’t come off until you wash it off with a cleanser hours and hours later! So, what went wrong? Let me tell you all about it:
First of all, it broke me out and that is the biggest NO-NO for me. I can probably take anything else but if a product starts giving me pimples there is just nothing that will make me like it.
Second: When you just put it on it feels fine, but an hour or two later it feels like you have a mask on, literally! The only thing I can compare that feeling to is as if you put paint, a thick layer of paint on your face. That made me really uncomfortable and it felt weird to smile or even talk.
Third: Besides it breaking me out, it also made me itchy in some areas on my face. I would find myself scratching my jaw line a lot all day long, and this will make the foundation peel off of my face and then it looked horrible.
I really, really wanted this foundation to work for me, I was impressed by the staying power it has, I was able to take naps when using it and wake up looking like I just did my makeup. But it didn’t work, I don’t know if I just didn’t know how to apply it, or what, but what I do take with me is that I tried everything I could to try to make it work, I used different brushes when applying it, put a TON of moisturizer on before, used different primers under it, applied finishing powder or use it without it… nothing worked.
When I went back to the Estee Lauder counter to return it I talked to a different lady and she told me that all of this things happened because whatever it is that makes this foundation stay on all day makes it feel like paint on you, and they didn’t tell me this, but I am thinking that’s also what made me break out.
So, do I recommend it? NO, I don’t. I think this foundation with a lot more issues than benefits for you. If you are going to pay that much for something, you better get something you are going to use and be happy with.

Review time: Bare Minerals Foundation

I am excited to write my first review on something and amazed to know that there is at least one person out there interested in my opinion on the matter… so Emily! This one is for you!

I think we have all seen those Bare Minerals commercials on TV. Swirl, tap and buff! The idea of wearing a powder/mineral form foundation that doesn’t feel heavy on your face, provides great coverage AND is good for your skin is just too good to pass, wouldn’t you agree? But, gee! 60 dollars for a starter kit is not very affordable, specially if you are used to buying drugstore makeup for a lot cheaper than that.
So, is it worth spending that much money on makeup?? Does it do what it says? I will tell you all about it right now:
I used everything bare minerals for about 3 years, it took me a long while to decide to finally buy it. I went to the bareminerals website and ordered me a starter kit in “tan”. After a few days of using it I learned exactly how to do it and I was quite happy with the results. I must point out though, that back then I had different needs than I do now. When you have kids (this may not happen to everyone, but it sure does to me!) your skin changes. I get pregnancy acne and the color of my forehead gets darker than the rest of my face. I have way better skin when I am not pregnant. Anyways, when I started using BM (bare minerals) I didn’t need a “full coverage” foundation, I didn’t have acne scars to hide or blemishes to cover, so this foundation worked great. It did feel great on my skin, like I was wearing nothing on and application was fairly easy and most important of all, it did not break me out!

(This is me wearing BM, looks nice but notice the lighter area above my brows? I tried very hard to make my whole face look even but I guess I just didn't know how to)

So, should you invest the money and buy it? Before deciding this I think you should ask yourself a few questions:

What kind of coverage do I want my foundation to provide?
Do I have blemishes and acne scars that need a little heavier concealing?
Am I willing to pay 25 + dollars for a foundation refill every so often?

While you are answering these questions, let me give you some facts about these products:

Pros:
This brand of makeup really does make products that are good for you.
Even though the little jars containing the foundation look small, they will last you a long, long time.
The quality of the brushes are fairly good.
You will feel like you are wearing nothing after applying it.

Cons:
The first and most obvious one I would have to say is the price.
Buying your foundation online is not the most convenient thing to do, it is way hard to find a perfect match in the color that you need if you are buying through the website, it can be kind of hard to find a place that sells it near you (Nordstrom and Macy’s do, they’ll match you with a perfect color and you can return it if you are not happy with it, you can’t do this online).
If you are looking for a full coverage foundation, this is NOT for you. I don’t care what they say on the commercials, I would say this is a sheer to medium “buildable” foundation.
If you have spots on your face that need a little heavier coverage they will be harder to conceal with these products.
And you know how the informercials show that you only need a very small amount to cover the whole face?? Well, I don’t know how they do it, but that NEVER worked for me. I always put on a lot more than that. I guess you can do it the way they show you but don’t expect to achieve the “perfect” results they say you will.
Oh, and I almost forgot, I guess if you apply just the small amount that they say you should (which doesn’t work!) you won’t have this problem, but if you apply more, like I did, you WILL see your foundation sticking to things that touch your face, like the phone, and according to Leslie Blodgett (BM Ceo) this will NOT happen to you if you use her products.

So I hope this will help you all decide whether you should or should not purchase these products. As for me and why I don’t use bare minerals anymore? Like I said, my skin has needs now that BM is not able to take care of. I found different liquid foundations out there that are full coverage and good for my skin as well.

Thursday, May 20, 2010

Foundation and Concealer application 101

Having recently watched Julie and Julia on DVD and after all the countless youtube video tutorials I became inspired about starting my own little site dedicated to all things beauty. I know all of the makeup gurus on youtube and all of the reviews I have read on different blogs and websites have helped me a ton on making decisions about what kind of stuff to get and how to apply it on my face and if they will work or not. So here is my first post, I decided to do it on Foundation application and concealing blemishes and acne scars because I found that this was one of the hardest things to learn to do right for me. Please remember, just because I do it this way, it doesn't mean that this is the only way or the "right" way of doing it... there is a bunch of different techniques, tools and products out there for you to choose from. This is just what worked for me.

Let me start by showing you what my face looks like without concealer or foundation on. Also, I have combination skin, this means, is oily on my T zone (chin, nose, and forehead) and dry or normal everywhere else. The reason why I am wearing eye makeup is because I didn't decide to start my blog until after I did my eyes, and NO, I don't usually do my eyes first, I just did it like this today because I am using pretty bright colors and I find that I have less issues with eyeshadow fallout if I do my foundation routine after, see? that's just one of those things that you learn on your own after making many, many mistakes.

My very first step (after having washed AND moisturized my face, of course!) is applying a very thin (I mean it, very, very thin) layer of Clarins Instant smooth perfecting touch all over my face, except for my nose. This thing is amazing on my face, its supposed to make your pores and fine lines appear less noticeable, and it does that for me, but that is not the reason why I use it. I just recently started using "liquid" foundation, I used Bare Minerals foundation for about 3 years (If you would like a review on this, leave a comment), and changing from a powder form to liquid just brought a whole list of issues to take care of to make it look perfect, for instance, how to apply it, what to use to apply it with? how to make it last? and the main issue for me was getting rid of those dang dry spots that liquid foundation can bring or show. So, after trying many different foundations, brushes, moisturizers, lotions, etc, I came accross this miracle cream from Clarins, I did a lot of research on it before buying it (it's not the most affordable thing out there) and after using it for about a week I decided this is the best thing out there to take care of my dry spots. It was a little hard to learn how to apply it, but believe me, once you learn, you will love it! One thing to keep in mind is that this cream is extremely moisturizing (I think that is what made my dry spots dissapear), so you need to be careful where you apply it, because it can make you look oily if you put it in areas where you already have oils.
Anyways, after applying it you are supposed to let it sit on your skin for a while, I dont, I go right straight to the next step, I found this works better for me.

The next thing I do is apply Primer... I can NOT emphasize enough the importance of wearing a primer right before applying any makeup on your face. It is extremely important for two reasons: 1st: It will prepare your skin for a flawless application, it will, depending on what kind of primer you use, help the appearance of your pores and leave your skin smooth and ready for concealer and foundation; and 2nd: Primers act as a glue that will keep your makeup on a lot longer than if you just wore your makeup without a primer (I hope that made sense), so if you are wondering what one of the secrets to make your makeup last for hours and hours, this is it!
I have a few different brands of primers, but this is one of my favorites: Mac Prep and Prime with Spf 50. So I go ahead and apply a thin layer all over my face. Now I am ready to apply any makeup on!

Once again, this is my face, showing all of my imperfections, if you notice, I have blemishes and acne scars that I need to hide. It's kind of hard to see it in this picture but the area around my nose is really red, so I will show you how I get rid of it:


This is my Make Up For Ever Concealer Palette in #1.
To conceal your inperfections the right way you need to learn how to counter act colors, I don't know all the basics yet, but I know enough to make it work for me: Here's the scope: If you want to conceal redness, you need to use green concealer. If you want to conceal purples (like undereye circles and veins), you need to use a concealer with an orange undertone. So, on that palette I use mostly the two colors on the ending right.

This is what I look like after concealing all the imperfections that need concealing. I look dumb, I know! Oh, btw, I use a small concealer brush that I bought at Target, I forgot to take a picture of it, but it's a studio tools and it costed me 2 dollars I think.


This is the foundation I am using at the moment: Lancome Teint Idole Ultra. This is a Full Coverage foundation and it's supposed to last 14 hours.


And this is what I use to apply my foundation with. This is a Mac 130 and I absolutely love it. It was a big investment but worth every penny. I have tried applying my foundation with your normal foundation brush, dry sponges, damped sponges, fingers and none of those things looked as nice as applying it with this brush.

This is just showing you half of my face with foundation and half without it. See the difference??

Something I need to mention is that I stipple my foundation onto my face, I dont do the swipping motions, yeah, it takes a little longer to do it like this, but you definitely see a difference in the final look. You could swipe your foundation on if you like, but I find that if I do it like that, all of the concealer that I applied earlier, just washes away.
Undereye concealer

I use Laura Mercier's undercover pot in # 3. The two concealer on the top are as follows: Left: All over face (I don't use it, I like my MUFE palette better). Right: Undereye concealer. I love this, it is so smooth and glides on nicely under my eyes. And lastly, the little powder in the bottom, this is a finishing or setting powder specially made to be used with this concealers, I use it only under my eyes, applying a finishing powder on after concealer or foundation will help it set and stay on a lot longer.

Using my ring finger I grab a small amount...

... and I start very gently dabbing it onto my undereye area. Be careful, the skin under your eyes is very sensitive.

Next, I apply the finishing powder under my eyes.

I use a Bareminerals "Heavenly Eye" brush. You can use whatever you have on hand.

And Tah Dah! Foundation and concealer application complete! I know it doesn't look quite right yet, but remember, I haven't done my eyebrows, or haven't applied blush or lipstick yet.
In the next post I will show you how to do your eyebrows.
Peace out!