Wednesday, December 8, 2010

Black smokey eyes.

I was watching an old episode of "Keeping up with the Kardashians" and Kim was wearing a black smokey eye that faded into a "mud" tone as it got closer to the crease and super dramatic false lashes, so this is me trying to recreate it on my own.


I absolutely love how this turned out, this is now one my favotire looks ever.
Let's get down to the stuff I used:
I knew I needed a "muddy" toned eyeshadow, and this one is the closest that I could come up with, I've had this shadow for a long time, about 7 years and it's from Yanbal but really couldn't tell you what it's called. I know Mac has a mud tone shadow as well that would work perfectly.

Please don't feel like you have to go buy these products to achieve this look, use what you've got already.
I used: The lightest shadow on my Smokebox Eyelights palette from Smashbox (for a highlighter).
Black Dog from UD's black palette.
The flesh toned eyeshadow from UD's yerba.
Painterly Paint pot from MAC
Lancome's black kohl eyeliner.
Sumptuous Mascara from Estee Lauder; and,
The mud toned shadow from Yanbal.

As usual, here is the before photo.

Prime your lids with Painterly, even under your lower lashes.

With a crease brush, apply the mud toned eyeshadow only on your crease, be sort of generous with it.

with a different brush apply black dog under your crease, on the area where you didn't put the mud shadow, like so:

You are going to have to play with the colors a little bit, applying more of the black as needed and blending it on the crease area with the mud shadow, so that the transition from one color to the next is smooth, I really hope that made sense.

With a clean brush, blend out the harsh edges and apply the fleshtone shadow on your crease, right where the colors end. Blend well. Also, apply your highlight on your brow bone.

Line your water line really good, be a little messy and apply plenty of eyeliner.

With a smudge brush, or a pencil type of brush, smudge the excess eyeliner under your lower lashes.
With the same smudge brush, apply the mud color on top of the black area under your lower lashes.

Apply eyeliner on. Go dramatic.

A couple of coats of mascara.

If you are going to wear false lashes, right now is the time to put them on.

I love false lashes.

And ta-dah!

On my cheeks: Mac's melba blush, Nars Laguna bronzer and Stila Illuminating finishing powder.
Lips: Lancome's Lipstick in Love it, Mac's lipglass in C-thru.

Monday, December 6, 2010

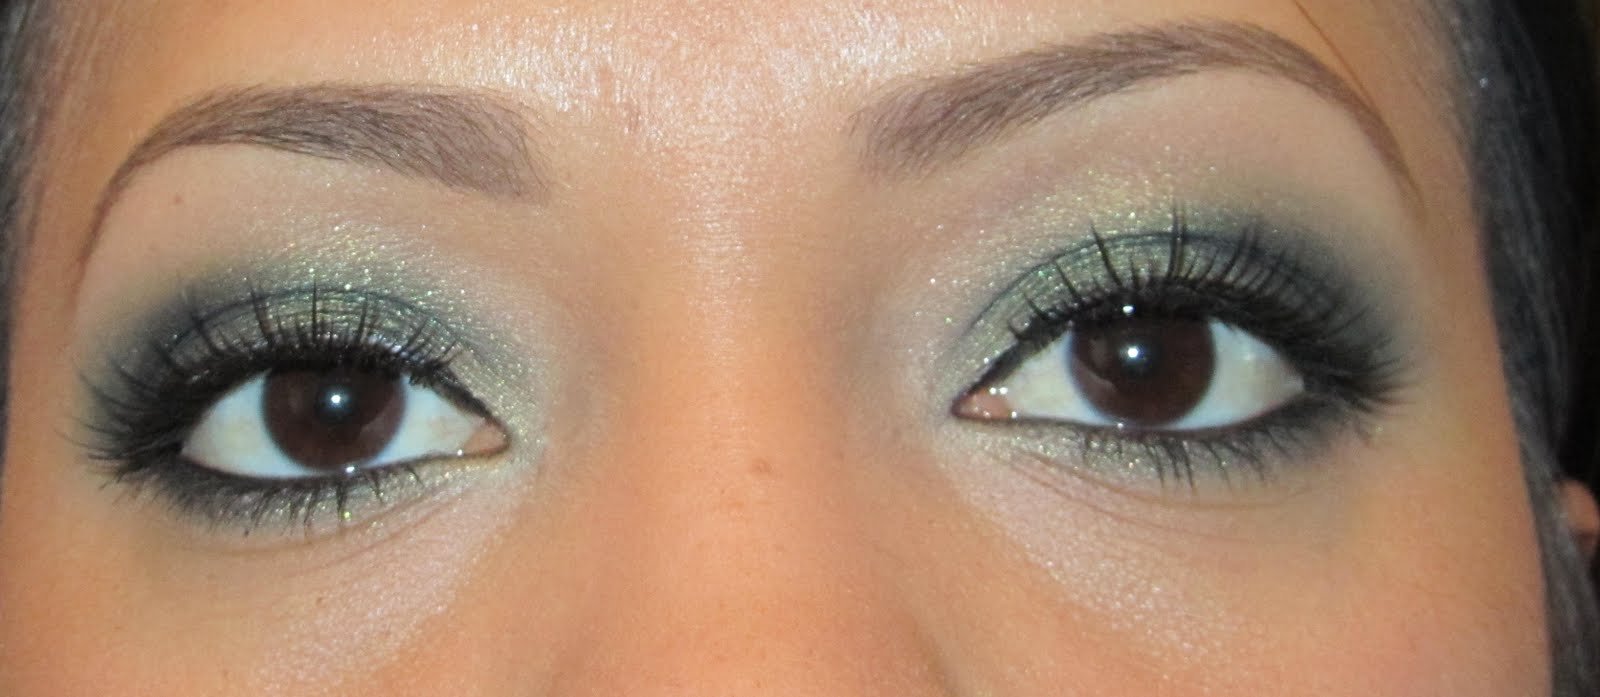
Going green, perfect for the holidays

This look was inspired by TiffanyD, my favorite youtube makeup guru. She recently did a tutorial on holiday greens and I loved it, so here is my version of it.

What I used: Urban Decay Yerba (only the green shadow of the palette), Smashbox Masquerade palette (again, only the green shadow), Stila Finishing powder in gold, Bare Escentuals gold powder (Can't remember the name of it, but its just a gold loose powder), Mac Delft paint pot, Mac Painterly Paint pot, Makeup forever Aqua Eyes Eyeliner in Black, Lancome Artliner in Black and Estee Lauder Sumptuous Mascara.

First: Apply Painterly all over your lids, all the way up to your brow.

With a brush, or your finger, apply a thin layer of delft from your crease down. Also do this under your lower lashes, leaving the inner corner of your eye clean.

With a brush, apply a generous amount of the green shadow in the Masquerade palette, all over delft, do not go above the crease. Apply this green shadow under your lower lashes as well.

With a clean brush, blend the edges, it doesn't have to look perfect, just try to blend it out as much as you can.

With a crease brush, apply some of the green shadow in the UD palette on your crease and outer corner of your lid, blending it well. This is going to add more definition to the look.

Now, apply a small amount of the Bare Escentuals gold powder on your crease, blending it really well. It should look something like this:

I guess I forgot to take a photo of this, but I also used a white eyeliner (any kind will do). Line your inner corner of your eyes with the white liner. Like so:

With a small brush, apply the BE gold powder on top of the white liner. Also, apply the Stila finishing powder in Gold on your brow bone.

Line your eyes. I did a super dramatic winged look.

Apply mascara, if you are not wearing false lashes, apply two or three coats on.
Also, line your lower and upper waterline with black eyeliner.

I am officially addicted to false lashes (thanks, Carla!), so I have mine on, I am wearing Model 21 Lashes.

And that's it. This is the final look:

On my cheeks I am wearing Nars Deep Throat and on my lips Lancome's Love it.
I hope you like this look!

Super smokey eye look


This look was inspired by one of the older episodes of "Keeping up with the Kardashians". I will post the instructions soon.

Saturday, December 4, 2010

Foundation routine, updated

So I thought it was time to show you how I apply my foundation nowadays. I have changed some things since I posted my first foundation tutorial and as of right now I am extremely happy with the products I use and the time it takes me to do it.
This is what I use:
Mac prep and prime (primer), Lancome Nutrix Royal Body (lotion), Lancome teint idole ultra, I have two different shades because I found that mixing them both gives me the perfect shade for my skin tone; Clarins smoothing cream, Laura mercier concealer and setting powder AND (this is my newest, awesomest find!) bare escentuals heavenly blush brush.

It is extremely important to have a clean face to begin with. This is the "before" photo.

The very first thing that I do, after treating my face with my Clinique 3 step system, is apply a really moisturizing lotion all over my face, I use Lancome's Nutrix Royal Body, doing this will help reduce the appearance of flakes big time.
Next, apply a good quality primer all over your face. I absolutely love Mac Prep and Prime, this stuff is like glue! It will keep your makeup on that much longer.
Also, I forgot to take a photo of this step, but applied a very small amount of Clarins Smoothing cream on my "Smile Lines" and under my eyes, those are the areas where I am dried the most and Clarins takes perfect care of that for me so I don't get my foundation to look caked on later during the day.

I don't know if you have heard about this Sigma brush, a couple of the people I follow on youtube use it and they love it for foundation application, they prefer it over their own Mac brushes and I don't happen to have it and one day when I was looking through my brush collection I found this next baby:

This is my Bare Escentuals Heavenly blush brush. I've had it for about 5 years and barely ever used because I don't like this type of brush for blush application, and then I noticed that it looks a lot like the Sigma one, so I decided to try it out with my foundation... I'll tell you more about it in a second.

For my foundations, I mix two shades because my foundation doesn't have the "right" color for me, this works pretty great.

Once my foundations are mixed, I dip my brush in the liquid.

Here's the cool part about this brush. I kid you not: From the moment I dip the brush in the foundation mix, till the moment I am done applying it to my face it takes me about 90 seconds! How awesome is that! This brush is amazing!! I don't know how much better the Sigma brush would be but I am extremely happy with my BE one. It is so easy to apply your foundation on, there is no streaking at all and the finish is flawless. If you haven't tried a flat brush like this, I totally recomend you do!

Foundation all done.

I have serious undereye circles so I apply concealer on that area. If you do apply concealer under your eyes, make sure to be extra gentle and use your ring finger.

Before and After (I did my eyebrows and applied a little bit of blush as well)! I know, I still look like a ghost, but once you do your eyes and apply some color on your lips you'll look like a different person.
** If you noticed, I didn't apply ANY concealer AT ALL on my face except for under my eyes. I owe it all to Clinique's 3 step skin care system!

Green smokey eye, perfect for the holidays!

This is just a teaser, I will post the instructions, step by step, very soon! Let me know if you like this look!


Saturday, October 16, 2010

Model 21 False Lashes, #21

I tried on a different pair of my new Model 21 Lashes. I am using the #21's.

May I just say... I LOVE this specific model! It makes my smokey look so much more dramatic!

Down to the review: well... I am still really new at wearing false lashes but for the price that I paid for these babies I really love them. I think they look awesome!

Are they comfortable? Hmm.. as comfortable as false lashes can be I guess (that's not a very good explanation, is it?). What I mean is that they are not bad at all (I am talking about this specific model (#21)) they do feel a little bit heavy when you put them on but after a few minutes you forget about them, really.

As with all of Model 21 lashes, these ones, too, have a thick lash line (I don't know what that little line that holds all the hairs is called), but I honestly don't think its a big deal at all. I don't see when on myself unless I am looking like 2 inches away from the mirror, but who looks at you that close??

Check these babies out!!

I really want to be true to the review so here is a photo of the lashes really up close.
Notice how my real lashes don't separate from the false ones?? I am learning how to do it better and better everytime!

And that's what you see when you close your eyes, but again, that's only if you look at it extremely close!
Overall, I highly recommend this lashes.

Makeup Organization

As per request, here is a whole post about how I organize my makeup.
I don't have much room to keep all of my stuff out AND I have a 2 year old little boy that likes to touch everything so I am forced to keep my stuff out of the way and in places that can be child-proof.
This is the kids bathroom:

Most all of my stuff is on the top of this shelf. On the lower portion of it I keep my false lashes.

I bought this organizer at Lowe's. I think I paid 19 dollars for it. It has tons of little drawer and it's the perfect size for my little bathroom shelf. The bags on the top are filled with lipsticks.

Each drawer has specific things assigned to them.

This is under my sink. I keep my palettes and everything else there.

This is my brush collection. I made the box myself and the foam inside is the stuff you use to make floral arrangements.

That little set of drawers is where I keep my eyeshadows that don't fit anywhere else.
That basket is filled with the stuff that i use daily, sucha as foundation concelaer, mascara, eyelash curler, blush... well, you get the point. When I want to change my style a bit I just put the stuff back where it goes, either in the organizer above the toilet or in the drawers under the sink and grab whatever it is I want to wear.