Saturday, June 26, 2010

Review time: All Cosmetics Wholesale

This is a review for the "All Cosmetics Wholesale" (www.allcosmeticswholesale.com) website and NOT the products that they sell.
All Cosmetics Wholesale is a website where you can find high end brand cosmetics for a fraction of the price that you would pay at a department store.
I came accross this website a long time ago when I was looking to buy Mac products for a cheaper price than sold at the Mac counters. It took me a long time to finally decide to buy from them, mainly because I didn't know if they really sold the "real" stuff.
So I watched a few reviews on youtube (there were only a few) and after going to the site over and over I finally decided to go for it.
Here is the stuff I bought from them:

First thing I will say about this site is that because it doesn't look as nicely put together as other makeup websites, such as sephora.com, it is kind of harder to trust it, it might not be like that for everyone, but it is for me, first impressions do matter on my book!
After you get passed the looks of it and start deeply looking into it, they actually have a very nice selection of brand name products, they seem to run out of stuff fairly quick so you have to be diligent when looking for a specific product and buy it right away if you can.
When it comes to shipping, they use USPS for most of their orders and I was pleasantly surprised to get my products just 4 days after I ordered them.
As far as the products go, I can tell you that they are the real stuff. I am not really sure how exactly they afford to sell everything at such a low price but somehow they do. Some of my stuff came without a box (when this is to happen, it specifically says it on the description of the product before you buy it) but that doesn't mean that the quality of the product has been compromised in any way.
The prices are fairly low on most stuff. Some brands like Mac still have high prices but if you look really good every now and then you can find pretty good deals.
Here is a couple of examples of the prices this website offers:
YSL (Yves Saint Laurent) Powder for eyes $14.99 (Regular price $60.00)
Smashbox Desert Chic Kabuki Brush $8.99 (Regular price $28.99 or so)
Smashbox Photo primer $10.99 (regular price $20.00)
Urban Decay Deluxe Eyeshadow $7.99 (Regular price $18.00)
I won't post the prices for every single thing I bought, those examples just show you how low their prices are so needless to say I will be buying from them again and again.
There is only one things I was not pleased with: They don't list a phone number to contact them, if you have a question you will have to email them but besides that everything was pretty much perfect. I did email them to ask them a question and they answered promptly, so that was great.

This is the only one item that came damaged and I will email them about it and see what they say. I am pretty sure they mail all products inside the US with USPS insurance, so hopefully they'll be able to get me a new YSL color palette. I'll keep you all posted.
Over all I do recomend this webiste 100%. They are fast at shipping their products, offer great prices and they do sell real high end brands.

Monday, June 21, 2010

Tutorial: Playing with grays

I know I've been off the radar for a few days, this pregnancy is starting to take a toll on me but believe me, I am trying. This is one of the last two tutorials I will be posting for a while. I didn't notice how big my nose is getting so next time I take pictures of myself will be after the baby is born and the bloating has gone down... anyways, enough complaining... let's get to this tutorial!

This is another of my smokey eyes look, I hope you all enjoy it as much as I did.

This is a list of the products that I used, feel free to use whatever you have on hand, no need to buy this specific products to make this look work: Mac Painterly Paint Pot (neutral color), Mac Blackground paint Pot (Black), Mac Blacktrack Fluidline (Eyeliner), Lancome Hypnose Mascara. As for the shadows, I don't have specific names for them, I use the dark gray and light gray from my Sephora Blockbuster Limited edition palette; and a couple of colors (neutral, skin tone and white shimmery) from my BH cosmetics 28 Eyeshadow neutral palette.

First step, as usual, start with clean eyelids.
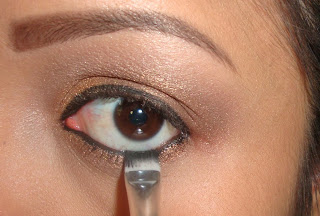
Apply a neutral color shadow base all over lid, all the way up to your brow bone (Neutral Shadow base can be replaced with Eyeshadow primer). I am using Mac Painterly Paint Pot.

Apply a black shadow base as the picture shows. If you don't have black shadow base I guess you could skip this step all together and just apply the darkest gray shadow on that area instead.

Using a blending brush, try smoothing the harsh edges.
Apply dark gray eyeshadow over the black shadow base, the black base underneath will make the gray pop and look more concentrated.

Using a smaller brush, apply a lighter version of the gray shadow on the rest of the lid, all the way to your crease.

Find an eyeshadow that's close to your own skin tone and using a blending or crease brush, apply it to your crease in windshield wiper motion, this will smooth the lines in your crease.

Apply a thin line of black shadow base under your lower lashes, not touching the inner third part of it.

Apply dark gray shadow over the the black shadow base under your lower lashes.

On the inner side of your eyes apply a white shimmery shadow. Blend well.
Line your eyes. I went with a semi cat eye to make my lashes appear longer. Also, apply a highlighter shadow to your brow bone, I am using Shroom by Mac.

Apply eyeliner on your top and bottom water line, I am using Mac's Fluidline.
If your lashes are like mine, go ahead and curl them.

Apply a couple of coats of your favorite mascara.

Final look! If you have any questions at all do let me know!

Tuesday, June 15, 2010

Tutorial: Bronze Smokey Eye Look

As requested by my friend Carla, here is the step by step tutorial on my Bronze Smokey Eye look
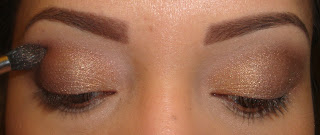
For this look I used 3 shadows. Two of them I got from my BH cosmetics 120 color palette. The two colors I used are circled in the picture above. One is a bronze looking color and the other one is brown copperish.
The other stuff that I used: All of this are MAC products: Shroom eye shadow, Painterly Paint Pot, Blacktrack gel liner, Lip glass in C-thru and Matte Lipstick in Honeylove.
First thing you need to do is start with clean eyelids.
Using your fingers (or a brush, if you like) apply a neutral shadow base all over your eyelids, all the way up the your eyebrows. The shadow base can be replaced with Eyeshadow primer.
Using a smaller shadow brush, apply the bronze color on the inner third part of your lids.
Apply the brown shadow all over the rest of your lid, all the way to the crease.
With a clean blending brush, smooth all the harsh edges.
With a crease brush, apply a thinner layer of the bronze color all over the brown shadow, this is what will create that smokey look. Blend any harsh edges again if you need to.
Using a larger brush, apply a highlighter color on your brow bone. I am using Shroom by Mac.
Now to the lower lash line. Using any smudge brush, apply a thin line of the brown color underneath your lashes.
Dip the same brush into the bronze shadow and apply it over the brown.
This is what it will look like so far.
Apply eyeliner as close to your lashes as possible.
Line your lower and upper water line. I am using Mac's blacktrack gel liner and a flat brush.
I didn't apply eyeliner under my lower lashes, instead I applied black eyeshadow with a flat brush, try to do it as close to the lashes as possible.
What it looks like so far.
Curl your lashes and apply your favorite mascara on. Mascara makes a world of difference, don't you think!?
As for the cheeks,
I do my blush the same all the time, if you would like to see my blush tutorial, click here
On my lips I like to go with a very neutral color, I love nude colors! I am using Mac's Matte Lipstick in Honeylove.
And lastly, apply a thin layer of lipgloss. I am using Mac Lipglass in C-Thru.
If you ever wondered about the lip color in most of my pictures, these are the products that I use most of the time.
Final look. Extra tip: Since this is a bronze smokey eye look, I applied extra bronzer on. You might want to do that too if you'd like.
If you would like to know about the other products I am using, let me know.

Review Time: High Definition Healthy FX Foundation SPF 15

Price: $38.00
Where to buy: Smashbox Counters, Smashbox.com, Sephora.com, Sephora Stores, etc.
Description: Creates flawless skin from within. This foundation's formula is packed with ingredients that work overtime to provide cellular nutrition for the skin.

My take on it:
I got this foundation on my Memorial Day Haul, my shade is Medium 2.  I was very hestitant about getting this foundation, mostly because of the fact that is not full coverage AND because I didn't find many reviews on it online, you know me, I like to review a product before I buy it, nontheless I still went for it, I decided that maybe the reason for it not having many reviews is because people just don't try it.
This foundation provides "medium, buildable, coverage", at first I didn't really know what that meant but after trying it a few times I think I've got it.  I'll explain later.
Let me tell you the things I like about this product:
First of all, I really like the fact that Smashbox Foundations make you look awesome in photos! Also, the bottle comes with a pump. The color is really close to my own skin tone. It's got SPF 15 and vitamin C which is great for your skin and I didn't breakout from it.
What I don't like about it:
It's price!  38 dollars for 1oz of whatever is a lot of money!  Is not full coverage.  It has a "powdery" look after you apply it, I don't think it's noticeable to other people but I see it. It can be a little hard to apply if you don't have the right tools.
Let's get down to application:
Smashbox suggests to apply one of their own primers prior to using the foundation, and to give it a fair try I did just that.  I will say this, I do like the smashbox primers I've tried, they make your skin feel awesome, seriously, but I still prefer my Mac Prep and Prime SPF 50 over any other primer, I won't go into this too much, this is a different post. Anywho, application was about the same with both primers.
I applied this foundation in a few different ways and using different tools everytime until I found what I liked best.
The first thing I tried was using a wet sponge, I definitely didn't like that.  It made the coverage even less concentrated, the sponge absorbed most of my foundation and it was quite hard to blend.
After that I tried my regular foundation brush, my Mac 187 and my Mac 130 brushes... and after trying different ways of applying it I came down to this: For me, the best tool to use was my Mac 130 brush, I didn't like it as good when I applied it with a clean brush, I noticed better results with a dirty brush (i know, gross, right!).  Also, stippling it on my face made it look it's best, I had less streaking and it was a lot easier to blend. 
Here are some pictures:
This is the real me, I had a horrible migrane the night before and very little sleep.  We'll see what a miracle can makeup do on this face!
After having applied all my makeup... very different isn't it?  Thank goodness for makeup!
So this is just with my foundation, concealer and bronzer on.  I mentioned earlier that this is not a full coverage foundation but that it is easily buildable.  If you apply a thin layer on it will provide medium coverage but if you apply a little extra on the areas that you need it the most you will get heavier coverage without it looking cakey.  You do have to be quick when building coverage though.
Final product and a little nicer photo. 
I do like this foundation a lot.  I know it doesn't meet all of the qualifications I expect from a foundation but I love how it matches my skin tone so close.  This one is a keeper.
I give this foundation a 4 out of 5.